The Skunkboard is a flash rom cartridge for the Atari Jaguar. It is an older device now and there are much better solutions available, but this one does do its job. Its biggest drawback is that it can only store one or two roms at any one time. If you want a different game on it, you have to connect it up to a PC and flash the new game.
I decided to simplify this process using a Raspberry Pi Zero, an I2C Pi OLED Screen (link) and a rotary encoder (link)
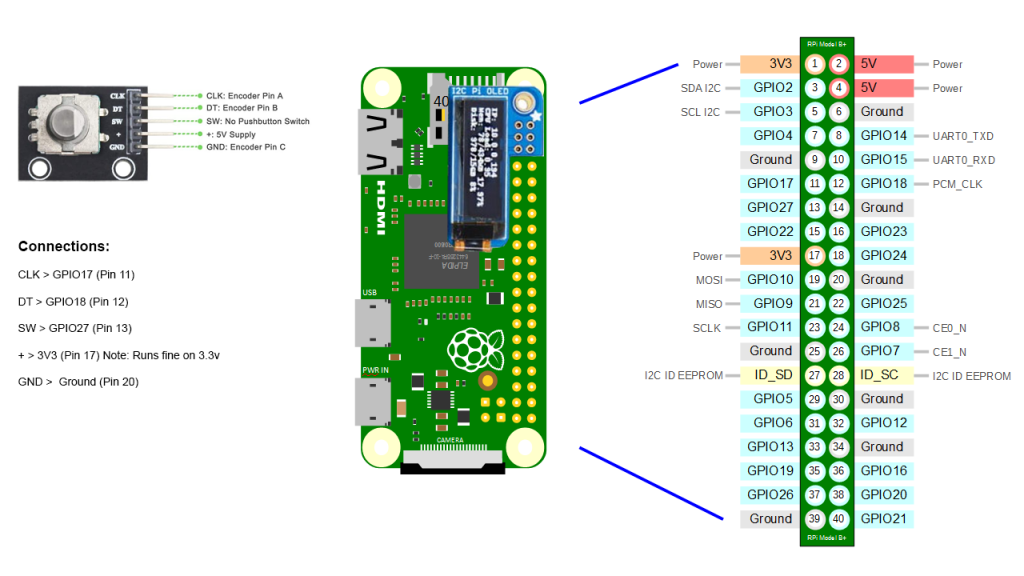
With these items wired together in the following configuration and a bit of python script, I have been able to construct a simple menu system to allow easy flashing of the skunkboard without a PC being involved.
I didn’t document the install as I went along, but hopefully the software setup should be as follows:
Flash an SD with Raspberry Pi OS Lite and do all the normal configuration on it. Things like WiFi configuration and changing the password etc.
Then, from the command prompt, run the following commands:
sudo apt-get update
sudo apt-get install python3-pip
sudo pip3 install adafruit-circuitpython-ssd1306
sudo apt-get install python-pil
sudo apt-get install -y python-smbus
sudo apt-get install -y i2c-tools
(Hopefully, that is all the dependencies but let me know if it doesn’t work!)
Then you will need to download the application files, which can be found here.
Extract the contents of the skunkboard folder in that zip and place those files in /home/pi
Now set the permissions on the files by typing:
suse chmod +x startmenu.sh
suse chmod +x jcp
Then run the menu by typing:
./startmenu.sh
You will need to put your jaguar roms in the /home/pi/roms folder for the menu to see them. They must be extracted with a .j64 extension.
Hopefully, you should now be able to power on the Jaguar to the green screen. Select the rom using the rotary dial, push the dial to select, then select which bank to install it to and finally press the dial again to start the flashing process.
If this all works ok then you can add the following line to your /etc/rc.local file just before the exit 0 statement at the end of the file:
/home/pi/startmenu.sh
This will make it automatically run when you reboot the raspberry pi.
The final product should look something like this:
To finish off the project, you will want to fit this inside a case of some sort. I have uploaded the STL files here for the case I used, so if you have access to a 3D printer, you can print this yourself.
I will probably re-design this case as it’s not brilliant, but it serves the purpose for now.

UPDATE
I have now re-designed the case for this and made it an all in one unit. I’ll update this write-up in the future and add the files for the new case design in case anyone wants to try and build their own.