I already have a few retro PCs in my collection, but I was missing one specific era, and that was the era when the 3dfx VooDoo cards hit the shelves. A friend of mine got one for his pc, and it was a complete game-changer back then. Everything went from blocky-looking textures to gorgeous, smoothed polygons.
The price of VooDoo cards is now quite high, costing around £120 for a working one. But where is the fun in buying a working one when you can buy spares and repairs for a 3rd of the price 🙂
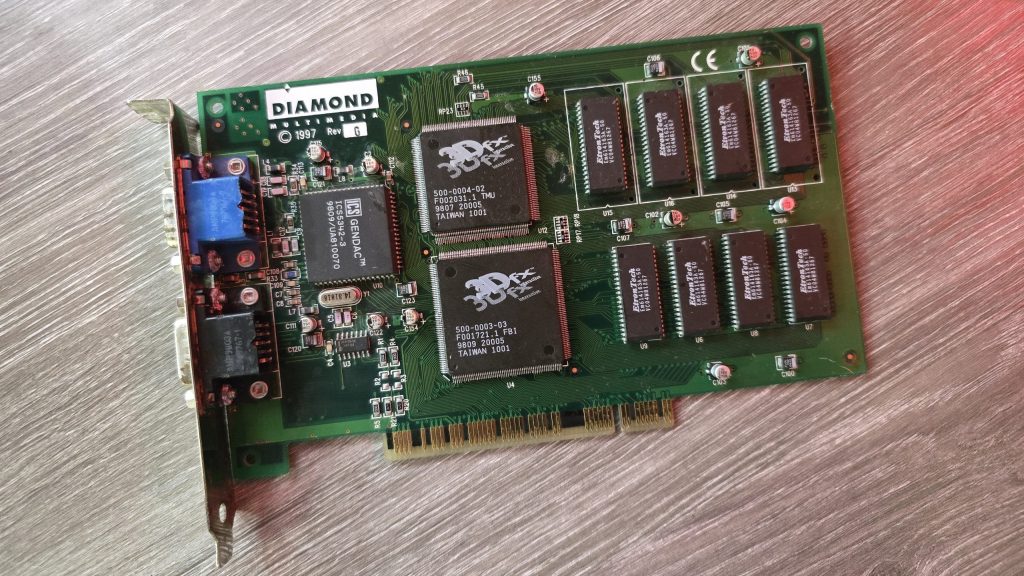
So for 39.99 inc postage, I picked up a Diamond Monster 3D VooDoo card. I had a small concern that the previous owner had admitted to fixing a couple of traces, which meant he had at least attempted to repair this card and had not succeeded. So could I do any better?
I gave the card a quick clean and inspected the traces that he had already repaired. I guess this card was chucked in a box at some point and had gotten scratched. They looked fine, but I re-did them just in case. I also noticed a couple of missing capacitors. There were only decoupling caps, but I replaced those anyway.
The next step was to test it out and see what state it was in. And things were not looking good. I ran the 3DFX diagnostic utility mojo.exe from DOS, and it just hung the system straight after DOS4GW.exe was loaded.
So I then tried booting into Windows 98. Amazingly, it did actually detect the card and installed the driver, but once installed, I got a yellow exclamation mark saying there was a resource conflict. Hmmm, that’s a bit odd. Just as a test, I went into the card settings and changed the memory address to a different one that wasn’t conflicting. I then launched the command prompt from Windows and tried mojo.exe again. This time, I got a different result.
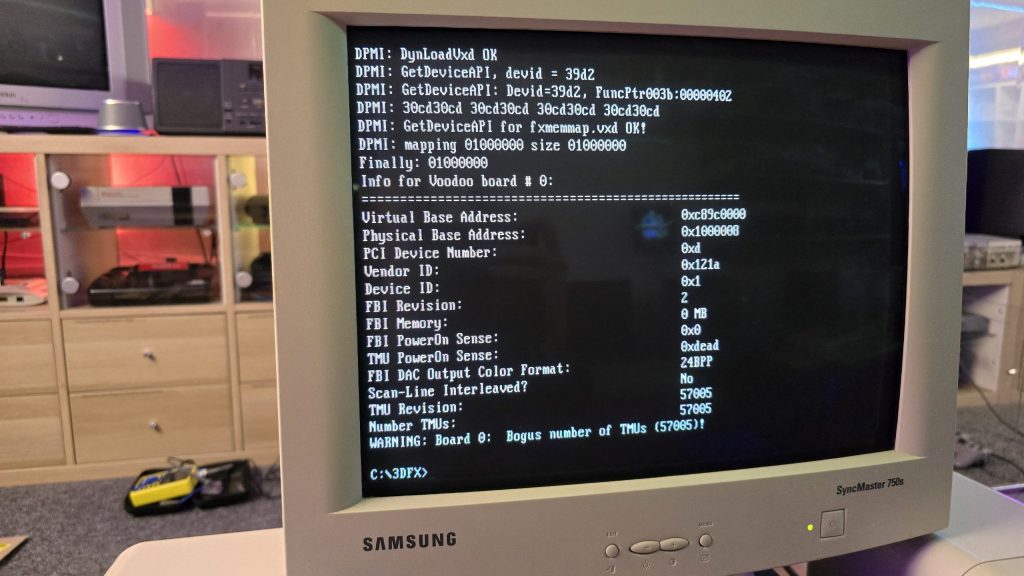
Some noteworthy things here are that it was at least detecting the card now, but no memory on the card and the error code 0xdead didn’t fill me with confidence. The Bogus number of TMUs 57005 error is also hexadecimal for the word DEAD.
The above test gave me some clues, and I started to wonder exactly how a memory space gets assigned to a card when a PC turns on. Without changing the address in Windows, I was still just getting a complete hang in DOS, so it seemed this initial process wasn’t working properly.
I read a whole bunch of docs and figured out that when a PC turns on, the motherboard will probe the IDSEL pins on each PCI slot and communicate with the device on each slot to get the vendor ID and hardware ID. This part must be working, as Windows detected the device.
The next step involved BAR registers (Base Address Registers). This sounded promising. Essentially, each PCI device can have up to 6 BARs. When the card is initialised, these BARs will be queried, and the result of these queries will tell the PC how many chunks of memory space or I/O space the card needs to function. This part of the process is reliant on the PC talking to the card over the PCI address bus. If this process failed, then the card could report that it needs either an incorrect amount of memory or all of it!
At this point, I had already reflowed all the pins on the FBI chip and TMU, as I knew this was a common failure on these cards. But the problem remained, so I needed to check all the address lines. I tried to find a nice picture of the PCI slot pinouts, but since the card doesn’t have all the pins present, it was difficult to work out the pin numbers, so I went with a different approach. Every pin on the 3D X card should in theory, be connected to the FBI chip. So I put my meter on continuity, put one lead on the first PCI card pin and then ran the second along all pins of the FBI chip. As long as I got at least one beep somewhere, I assumed the pin was connected fine.
I eventually came across one pin that didn’t seem to be connected to any pin on the FBI chip. So I followed the trace from that pin and found a smoking gun!
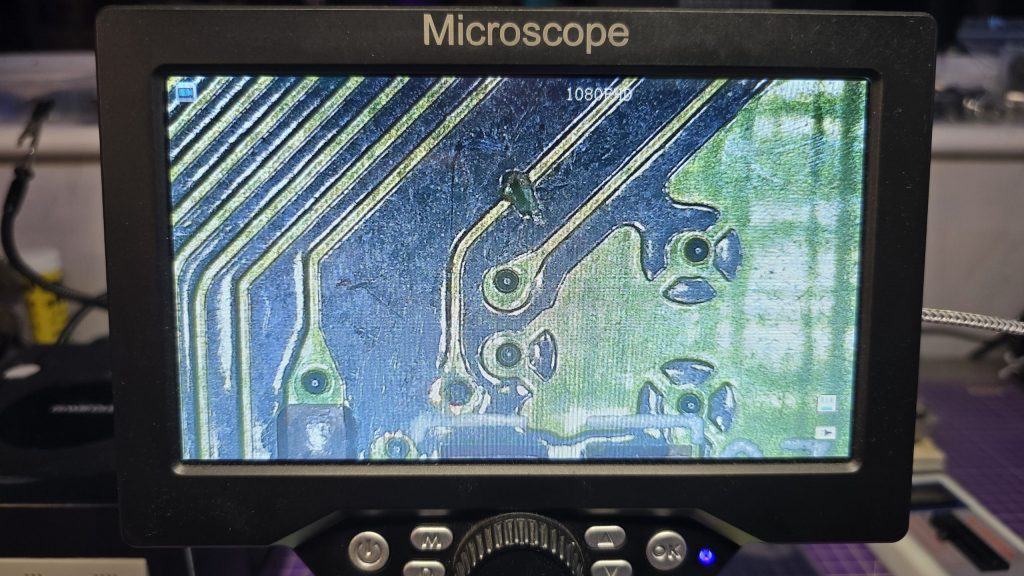
Checking continuity between the PCI pin and the via after the break confirmed that there was no continuity. So I carefully scraped away at some of the solder resist and placed a bodge wire across the gap. After confirming connectivity, it was time to do another test.
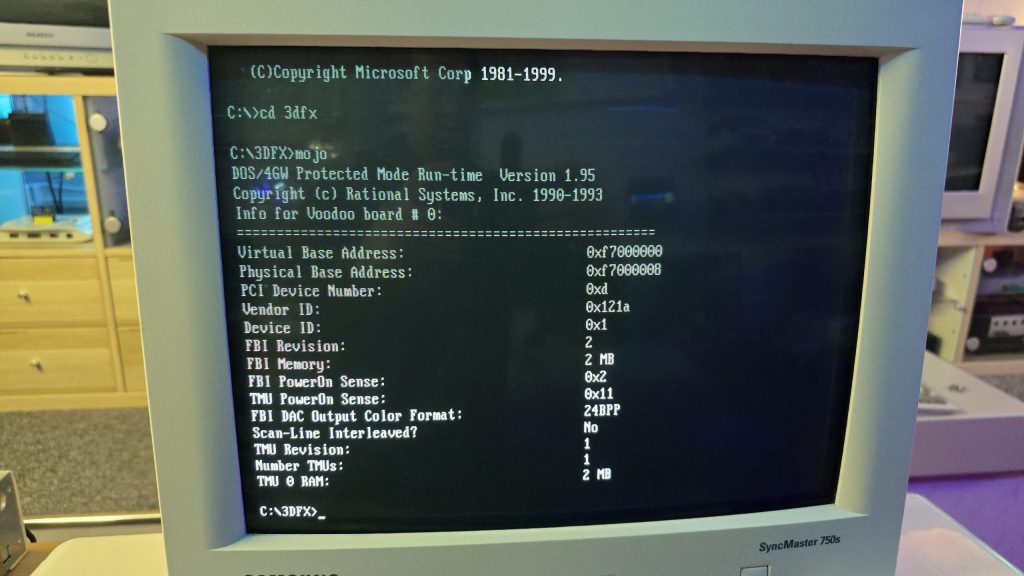
Result!!! After booting directly into DOS and running mojo.exe again, no hanging and everything looked good to go.
So once again, I booted into Windows, this time with no device conflicts. I ran one of the 3DFX demos, and it launched fine, but with one small issue. I could see a pattern of dots on some of the textures.
This was a different fault now, so it was time to move my attention to the TMU chip instead. After carefully inspecting my re-flow work, I noticed the slightest solder bridge between two pins relating to the address bus between the TMU and the memory chips. After clearing this final issue, everything is now working perfectly and I am in possession of a fully working £39.99 VooDoo card.